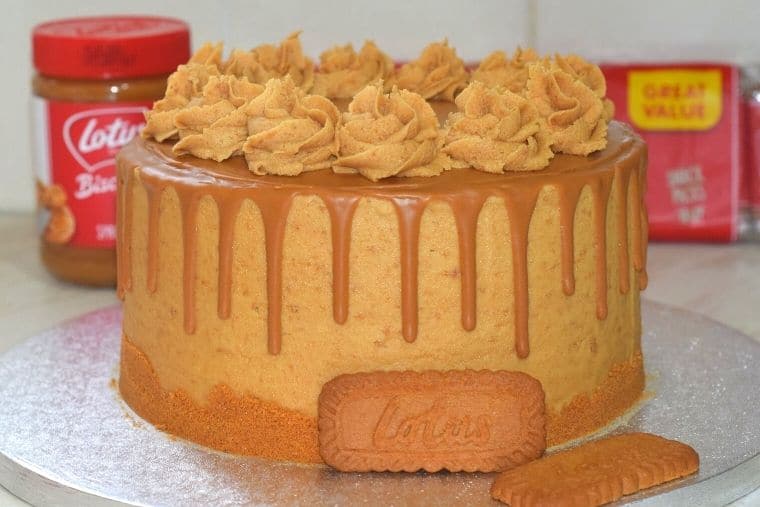
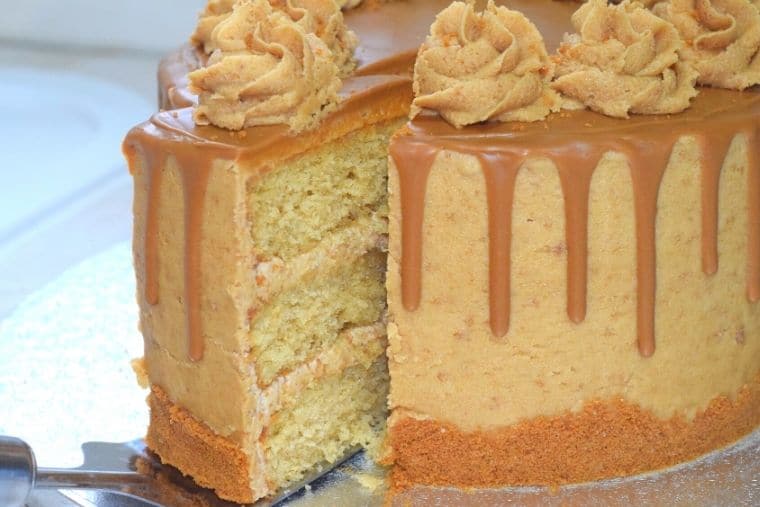
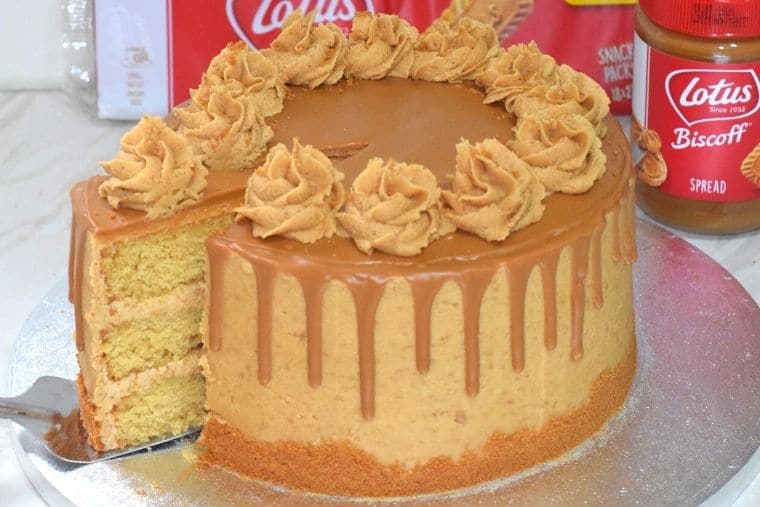
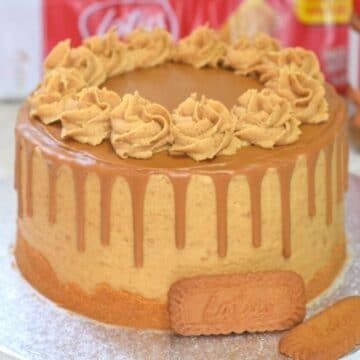
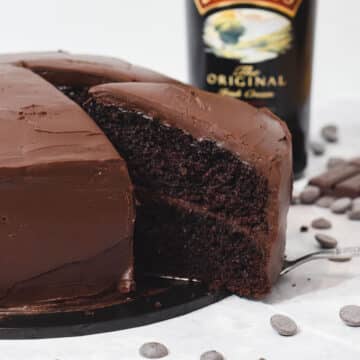
This best Lotus Biscoff drip cake has three layers of brown sugar sponge cake, a biscoff buttercream coating and filling, biscoff spread between layers and dripped over the top for an impressive biscoff birthday cake idea!
Jump to:
✏️ Why you'll love this recipe
This tasty Biscoff drip cake is one of my best-ever cake recipes and is perfect for any party or celebration. It makes an amazing cookie butter birthday cake!
You can also add a few other biscoff treats to the dessert table like these Biscoff white chocolate brownies, Biscoff cakesicles and Biscoff stuffed cookies.
This biscoff cake recipe uses three layers of soft cake and a delicious biscoff frosting. The biscoff icing is based on my favourite American-style buttercream with added biscoff cookies for a delicious texture!
There's also a cute Biscoff biscuit crumb border and biscoff spread drip to add even more Biscoff goodness.
🥘 Ingredients
This Biscoff drip cake recipe calls for the following ingredients:
Sponges:
- Unsalted butter: room temperature for better mixing
- Light brown soft sugar
- Eggs: large and room temperature
- Vanilla extract: use extract or paste over essence for a purer flavour
- All-purpose plain flour: sieve for a lump-free mixture
- Baking powder: check the expiration date before use
- Milk: semi-skimmed or whole works best for a creamy texture
Biscoff buttercream:
- Biscoff cookies
- Unsalted butter: room temperature for better mixing
- Powdered icing sugar
- Biscoff spread
- Cream: any type of cream works well or you can use semi-skimmed/whole milk
Filling:
- Biscoff spread
Biscoff drip:
- Biscoff spread
See the recipe card for quantities.
Tip: When measuring your ingredients, use weights rather than cups for greater accuracy. This is especially important for the amount of flour.
♻️ Substitutions / Variations
Ingredient substitutions
Along with the biscoff buttercream, I use biscoff spread between the cake layers for extra biscoff flavour, but this is optional.
You can crush regular caramelised biscoff cookies for the buttercream, or swap them for the biscoff sandwich cookies for extra creaminess.
I usually use the smooth Biscoff cookie butter spread in this recipe as it's best for the smooth drip, but you can also use the crunchy version instead.
You can swap the all-purpose plain flour for self-raising flour and reduce the baking powder to 1tsp.
Equipment alternatives
When I make this Biscoff drip cake as a three-layer cake, I use three round 8-inch cake pans. However, if you only own two 8-inch cake pans, you can split your cake batter evenly between them and bake for an extra 5-10mins.
Cut each of your sponges in half to give you four layers to your Biscoff celebration cake instead. You may need to increase the amount of buttercream frosting you use or use it sparingly between the layers.
I use a teaspoon to make the biscoff drip effect on this biscoff cake. However, you can also use a squeeze bottle, like the ones they use for sauces and condiments, or a piping bag with a small round piping tip.
📖 Method
Sponges:
- Preheat oven: 180°C / 160°C (fan) / Gas Mark 4 / 350°F
- For the sponges, cream together the butter and sugar, either using a spatula, electric hand mixer or stand mixer, until pale and fluffy. This may take several minutes.
- In a separate bowl, beat the eggs until whisked up to foamy, before adding this to the butter mix and beating until combined.
- Sieve in the flour and baking powder, folding in gently until just combined.
- Add in the milk and vanilla extract, stirring gently until you only just have a smooth mixture.
- Divide the mixture evenly between three lined cake tins and bake for 30-35mins, until the sponges no longer wobble, are firm to the touch and a skewer comes out clean. Allow these to cool on the side while you make the buttercream.
Biscoff buttercream:
- In a food processor or blender, blitz up the Biscoff biscuits, plus the optional extra 2, for 2-3mins until you get very fine crumbs. Set aside 2 tablespoon for the crumb border later.
- Beat the butter (either using an electric mixer or stand mixer) until pale, light and fluffy. This could take several minutes.
- Sieve half of the icing sugar into the butter and beat until combined, then repeat this with the remaining icing sugar.
- Once fully combined, add the cream (or milk), Biscoff spread and crushed biscuits, then beat until smooth.
Assembly and filling:
- Set aside roughly ⅕ of the buttercream into a piping bag (with a 1M tip) for the swirls on top for later.
- Once the sponges have cooled completely, cut off any peaks to give smooth flat tops on all of your layers.
- Spread a layer of buttercream on top of one of your sponges, then pipe a thick border on top (i.e. around the edge). Add half of your Biscoff spread filling, smoothing it out within the border.
- Sandwich a second sponge layer on top and repeat the above step before gently pressing the third sponge upside-down on top.
- Smooth a thick layer of buttercream on top of the cake and around the edges, smoothing and scraping until your cake has a relatively thin and neat outside crumb coating. Refrigerate for 15mins.
- Add the remaining buttercream (not saved for the swirls) to the top and outside of the cake. Smooth using a spatula and scraper.
- Add the set-aside Biscoff biscuit crumbs around the bottom of the cake and press in gently with the back of a spoon, to create a roughly 1-2inch thick messy border.
Biscoff drip:
- Melt the Biscoff spread in the microwave for 20-30secs until drip-able consistency.
- Dip a teaspoon in your Biscoff spread and test a drip at the top edge of your cake. If this creates a thick line and only runs partway down the side, you're good to go. If it hits the bottom, leave your Biscoff spread to cool for 5mins and try another test drip. If it's too thick to run, microwave for another 5secs. Repeat until your test drips are to your liking.
- Drip the Biscoff spread from your spoon at the edges of your cake until you have enough drips. Then fill in the middle of your cake top, smoothing gently with an offset spatula until you get an even layer.
- Using the buttercream set aside previously, pipe big swirls onto the top of the cake in a ring.
💭 Top tips
- Once your Biscoff cake layers have baked, let them cool for at least 20mins before removing them from the cake pan onto a wire rack to cool.
- To get smooth flat cake layers, cut off any peaked tops using a knife or cake leveller. Keep any offcuts and use them for decorating or turning into Biscoff cakesicles or cake pops!
- To frost your Biscoff cake neatly, it's best to use a cake turntable, a tall cake scraper and an offset spatula.
- To get smooth tops on your cake layers, use cake baking belts (a.k.a cake strips). You may need to bake for an extra 5-10mins if using these, as they slow down the process.
Biscoff buttercream tips:
- Beat your butter using a stand mixer or electric mixer until it's light and fluffy. It should take several minutes and will give you creamy Biscoff buttercream frosting.
- To crush your Biscoff cookies for the buttercream and Biscoff cookie border, I usually use a food processor. However, if you don't have one you can always crush them using a pestle and mortar or even put them in a plastic bag and bash them with a rolling pin.
Biscoff drip effect tips:
- When going for the drip effect on your cake, always do a test drip first. You want to see how far down the side of your cake this tester runs.
- If your test drip hits the bottom of the cake, your Biscoff spread is too hot. Allow it to cool for a few mins at room temperature before trying again.
- If your test drip is so sluggish it barely moves at all, then put it in the microwave for another 5 secs and try another test drip.
- For a peek at how I create the drip effect for this cake, check out my Pinterest or Instagram videos.
❔ Recipe FAQs
Your Biscoff drip cake should last for up to 3 days stored in an airtight container at room temperature.
Yes, wrap slices of your cake in cling film and then foil and freeze for up to 3 months.
You can make the brown sugar cake sponges and frosting 1-2 days in advance. Store the sponges wrapped in cling film. Refrigerate the frosting in an airtight container.
You can also freeze your sponges wrapped in cling film and foil.
Your buttercream frosting can also be frozen separately in an airtight container. Defrost and beat again to whip up to nice and fluffy before use.
The sponges and frosting should be kept in the freezer for up to 3 months. Defrost and use per the recipe.
🧁 Other goodies
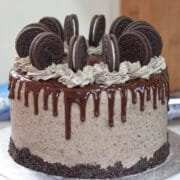
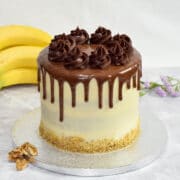
If you love a drip effect cake, check out my recipes for an Oreo drip cake and a banana walnut drip cake.
In love with all things Biscoff? Then why not give my best Biscoff dessert recipes a try - Biscoff cakesicles, Biscoff stuffed vegan cookies and Biscoff-stuffed white chocolate blondies. So much Lotus Biscoff joy packed into every bite!
Looking forward to some new recipes? Check out my Youtube, Facebook, Instagram and Pinterest pages for a few sneak peeks and some sweet inspiration!
Or if you'd like to hear about our latest recipes, why not subscribe to our newsletter?
📖 Recipe
Lotus Biscoff Drip Cake
Rate this recipe here:
Equipment
Ingredients
Sponges:
- 340 g (1½ cups) unsalted butter
- 330 g (1½ cups) light brown soft sugar
- 6 eggs
- 2 teaspoon vanilla extract
- 340 g (2¾ cups) plain (all-purpose) flour (see notes for self-raising flour swap)
- 4½ teaspoon baking powder
- 4 tablespoon milk
Biscoff buttercream:
- 100 g (½ cups) Biscoff biscuits (optional: plus extra 2 biscuits for border)
- 250 g (1 cups) unsalted butter
- 575 g (4¾ cups) powdered icing sugar
- 125 g (½ cups) Biscoff spread
- 4-5 tablespoon cream (or 3-4 tablespoon milk)
Filling:
- 200 g (¾ cups) Biscoff spread
Biscoff drip:
- 125 g (½ cups) Biscoff spread
Instructions
Sponges:
- Preheat oven: 180°C / 160°C (fan) / Gas Mark 4 / 350°F
- For the sponges, cream together the butter and sugar, either using a spatula, electric hand mixer or stand mixer, until pale and fluffy. This may take several minutes.
- In a separate bowl, beat the eggs until whisked up to foamy, before adding this to butter mix and beating until combined.
- Sieve in the flour and baking powder, folding in gently until just combined.
- Add in the milk and vanilla extract, stirring gently until you only just have a smooth mixture.
- Divide the mixture evenly between three lined cake tins and bake for 30-35mins, until the sponges no longer wobble, are firm to touch and a skewer comes out clean. Allow these to cool on the side while you make the buttercream.
Biscoff buttercream:
- In a food processor or blender, blitz up the Biscoff biscuits, plus the optional extra 2, for 2-3mins until you get very fine crumbs. Set aside 2 tablespoon for the crumb border later.
- Beat the butter (either using an electric mixer or stand mixer) until pale, light and fluffy. This could take several minutes.
- Sieve half of the icing sugar into the butter and beat until combined, then repeat this with the remaining icing sugar.
- Once fully combined, add the cream (or milk), Biscoff spread and crushed biscuits, then beat until smooth.
Assembly and filling:
- Set aside roughly ⅕ of the buttercream into a piping bag (with a 1M tip) for the swirls on top for later.
- Once the sponges have cooled completely, cut off any peaks to give smooth flat tops on all of your layers.
- Spread a layer of buttercream on top of one of your sponges, then pipe a thick border on top (i.e. around the edge). Add half of your Biscoff spread filling, smoothing it out within the border.
- Sandwich a second sponge layer on top and repeat the above step before gently pressing the third sponge upside-down on top.
- Smooth a thick layer of buttercream on top of the cake and around the edges, smoothing and scraping until your cake has a relatively thin and neat outside crumb coating. Refrigerate for 15mins.
- Add the remaining buttercream (not saved for the swirls) to the top and outside of the cake. Smooth using a spatula and scraper.
- Add the set-aside Biscoff biscuit crumbs around the bottom of the cake and press in gently with the back of a spoon, to create a roughly 1-2inch thick messy border.
Biscoff drip:
- Melt the Biscoff spread in the microwave for 20-30secs until drip-able consistency.
- Dip a teaspoon in your Biscoff spread and test a drip at the top edge of your cake. If this creates a thick line and only runs partway down the side, you're good to go. If it hits the bottom, leave your Biscoff spread to cool for 5mins and try another test drip. If it's too thick to run, microwave for another 5secs. Repeat until your test drips are to your liking.
- Drip the Biscoff spread from your spoon at the edges of your cake until you have enough drips. Then fill in the middle of your cake top, smoothing gently with an offset spatula until you get an even layer.
- Using the buttercream set aside previously, pipe big swirls onto the top of the cake in a ring.
Notes
- You can swap the plain flour in the sponge for self-raising flour of the same amount and reduce the baking powder to 1tsp.
- If you only have 2 cake tins, split the cake mix evenly across these and cook for 35-40mins instead. Cut these cakes in half to give 4 layers instead of the 3.
- Always do a test drip first. You want to see how far down the side of your cake this tester runs.
- If your test drip hits the bottom of the cake, your Biscoff spread is too hot. Allow it to cool for a few mins at room temperature before trying again.
- If your test drip is so sluggish it barely moves at all, then put it in the microwave for another 5 secs and try another test drip.
Nutrition
Nutritional information is an estimate based on an online nutritional calculator, actual values may vary.

LeClue says
Will it be possible to comment the quantity of each ingredient please
Kachina says
Hi there, the quantity of each ingredient is listed in the recipe card, which is near the end of the post. Happy baking!
Sara says
Hi
For the biscoff drip effect-when I put the cream into the microwave-it didn’t melt and soften-kinda like the opposite??????thanks
Kachina says
Hi Sara, the biscoff spread will soften when warmed in the microwave. It only needs 20-30secs and you should be able to stir it for a smooth runny consistency. If your microwave is very high-powered or it's been in the microwave too long this could dry it out and bake it harder. If you're having issues, try starting with only 10secs at a time then stir. Hope this helps! Happy baking.
Arica says
I honestly have never had anything Biscoff, but I can only imagine how absolutely delicious this cake is!!
Sweet Mouth Joy says
It's super tasty! Definitely give Biscoff cookie butter a try
jeannie says
I love biscoff biscuits, totally a win for me!
Sweet Mouth Joy says
Thanks! There's so much Biscoff in this cake and I love it
Scout says
This is a gorgeous-looking cake and the epitome of Biscoff! I had never heard of this cake, so thank you for sharing. I'd love a small slice with cup of coffee 🙂
Sweet Mouth Joy says
Thanks, glad you like it!
Cook Took says
Awesome. The decoration of the cake is amazing. Instructions are easy to understand. Thanks for sharing this
Sweet Mouth Joy says
Thank you! Glad you liked it and hope your cake turned out well.
Mary says
What flour do you recommend? Is self raising better than plain in this recipe or??
Sweet Mouth Joy says
Hiya! You can use either plain or self-raising flour, as both will give you the same result if you adjust the baking powder amount per the recipe notes. I usually use self-raising flour because that's what I have more of in my cupboard. Happy baking!